
If your computer got stolen, how much data would you lose? Wedding photos, baby photos, important documents, photos of your recently deceased grandparents?
It’s vitally important that you have a backup solution ready for when disaster strikes, and one backup isn’t enough.
3-2-1 Backup
The basic principle of 3-2-1 Backup, is you have 3 copies of your data, stored on 2 different types of media and 1 of them is off site.
A good example of this is having one backup on an external hard drive at your house and an online backup.
Read more to find out about how to setup both a local and a cloud backup on a Mac!
Part 1 – Local Backup
The easiest way to do a local backup on a Mac is using Time Machine. It’s software built into most macs released in the last 10 years, and all it requires is an external hard drive.
The greatest thing about Time Machine is once it’s setup, it’s all automatic. As long as the drive is plugged in, it will backup. If there’s something wrong, it will bring up a little notification letting you know what happened and what to do to fix it (the most common problem is forgetting to plug the drive in).
Time Machine will save you from things happening like: your computer dying, the hard drive in your computer failing, your computer being stolen/lost (assuming they don’t also steal the backup drive) or files being accidentally deleted, overwritten or corrupted.
What it won’t save you from: Someone stealing your computer *and* your backup drive, your house burning down and taking the hard drive with it, some types of virus (that also infect the backup drive) or the very rare situation where both your backup drive fails at the same time as your computer (eg. a really bad lightning strike that breaks both your computer and backup drive).
[accordion clicktoclose=”true” tag=”h2″]
[accordion-item title=”Choosing a Hard Drive”]
Choosing a Hard Drive
There’s 2 different types of drives you can use for Time Machine, one is the Time Capsule (made by Apple), it works wirelessly however it it’s more expensive.
The more common option is a USB Hard Drive, these are available in many different sizes.
Time Machine will use all the space available on a drive to hold both the data currently on your Mac and older versions and deleted files as far back as it can. The bigger your backup drive, the further back you can recover data from.
To determine how big of a drive you need, it is recommended that you get a drive that’s approximately 2x the size of your current drive, though it will work with a drive that is the same size as your Mac.
To determine how big the drive in your Mac is, if you click the Apple Menu in the top left hand corner of the screen and go to About this Mac, then click the Storage Tab, it will show you.
Note: 1000GB (Gigabyte) is the same as 1TB (Terabyte)

You can see I have a 500GB Hard Drive, so a 1000GB (1TB) backup drive would be a good size for me.
Extra notes for buying hard drives
- For the most part, the brand of the drive doesn’t matter.
- Drives from companies like Seagate, Samsung, Toshiba, Western Digital, Lacie are all good.
- You should aim for something that has USB3. Most drives are already USB3 anyway.
- There are two sizes of drive, 3.5″ and 2.5″. The 2.5″ drives are smaller and don’t require a power brick to use, however the 3.5″ drives come in much larger sizes. A 2.5″ drive will be fine.
[/accordion-item]
[accordion-item title=”How to Set Up Time Machine”]
How to Set Up Time Machine
So, you’ve got a hard drive. All you need to do now is to set it up!
If you’re using a Hard Drive you already own, before you follow these steps you need to copy all your data off the drive. There is a way to split a drive in half and use half for Time Machine and half for data, but it’s generally not recommended.
Step 1: Plug in your Drive
The first time you plug a Hard Drive in, it might come up asking you if you want to use it as a Time Machine drive. If it asks you, click Yes and you’re done! Otherwise, proceed to step 2.
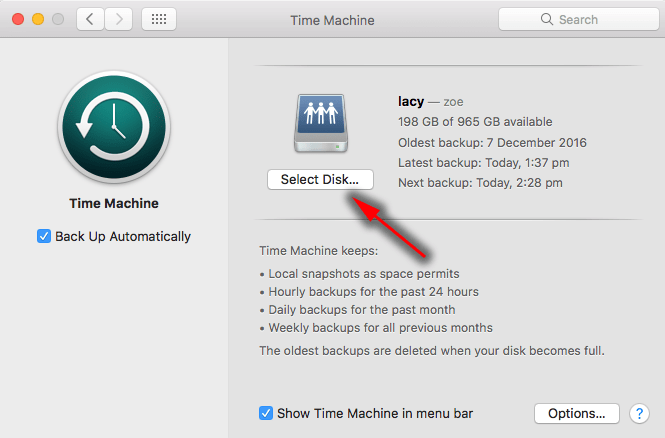
Step 2: Go to the Apple Menu in the top left corner of the screen then down to System Preferences
Step 3: Click on Time Machine

Step 4: Click on Select Disk
Step 5: Click on the Disk you’ve plugged in (if you have no other drives plugged in, it should be the only option)

Step 6: Select “Use Disk”
Step 7: It will ask you if you are sure you want to Erase the disk. Again: Make sure you don’t have any data on the drive you want to use as a Time Machine backup (if it’s a new drive, you won’t have any data on it so it’s okay). Then Click Erase.

It will now back up all your data onto the drive. The first backup may take a few hours to run, so leave it plugged in and let it finish.
From now on, whenever you plug the hard drive in, it will automatically backup. If you’ve got a laptop, I suggest you leave the backup drive on your desk at home, and whenever you put your laptop down, plug the backup drive in.
How do I know if it’s working?
If you go into the Time Machine settings in System Preferences, it will tell you what’s happening with the drive (including when it last completed a backup)

[/accordion-item]
[accordion-item title=”How to set up CrashPlan”]
There are a number of services you can use for backing up online. My personal favourite is CrashPlan, some others include BackBlaze, Mozy@Home and Dolly Drive. This post will explain how to set up CrashPlan.
Compared to a Local Backup, there are some pros and cons to using cloud backup
Pros:
- Stored offsite. If your house burns down, your data is fine
- Version Control and limited direct access. This is a pro, because in the case of a virus on your computer that deletes files, it doesn’t have access to the Cloud Backup, thus your backups will still be safe, even if a virus wipes out your computer *and* your backup drive.
- Once set up, completely automated. No need to plug a drive in.
- Data is backed up with encryption, so only you can decrypt the data (using your account password)
Cons:
- High Internet usage. If you’ve got a limited amount of internet bandwidth, you may need to reconsider this option as it uploads all your data via the internet. You can get around this a little bit by only backing up your most important data.
- Yearly cost
- Retrieving your data requires you to download it back again, so for a huge amount of data it can take a while
Cost: At the time of writing (January 2017), it is $5.25AUD a month for one machine, or $12.50AUD a month for up to 10 computers, including unlimited storage.
They also include a free 30 day trial. The following is how to set it up with the trial (and how to upgrade your account)
How to setup CrashPlan
Step 1. Go to the Website for CrashPlan: https://www.crashplan.com
Step 2. Click the Try it Free button up the top of the page

Step 3. Click the Download button under the Free section

Step 4. Click Download Crashplan
Step 5. Once it has downloaded, run the installer. It should be in your downloads folder.
Step 6. Once the installer has completed, CrashPlan will open
Step 7. Follow the instructions to create a new account

Step 8. Once you get to the main CrashPlan screen, you can click “Start Backup” next to CrashPlan Australia to backup to the cloud.

Here’s a few things to note
- Click on the “Change” button under Files to pick what files are backed up. If your internet isn’t very fast or you have a download limit, you should limit how much you back up. Eg. Backup your Photos, but don’t worry about backing up your downloads folder or your collection of pirated movies. If you’re not sure, I’d suggest ticking: Documents and Pictures to start with. If you store a lot of important files on your desktop, then select that folder too.

- You can go into Settings to change how often it backs up. In the following example, I’ve got it set to backup between 2am and 7am on Monday, Wednesday and Friday. Note that it won’t turn your computer on automatically, so you need to leave your computer on if you’re going to backup at weird times like I’ve got set. The plus side is, I never notice it backing up as it’s always done when I’m asleep.

[/accordion-item]
Did I miss anything? If you’ve got any comments or suggestions, feel free to leave a comment!
[/accordion]